CAT Shuttle Help

Use the links below, or scroll to your area of interest.


CAT Shuttle Installation and Update

  1. Open the CAT Shuttle installation and update page.
  2. Read the instructions and change notifications.
  3. Click on the Download button to download the CAT Shuttle Setup program.
  4. Run the CAT Shuttle Setup program. Example: CATShuttle_Setup120.exe*
  5. Complete the CAT Shuttle Setup Wizard.
  6. Configure CAT Shuttle on start-up, if needed.
* Your version of CAT Shuttle and the CAT Shuttle setup program may differ from those show in this help file.


Repair Only: Upon starting the CAT Shuttle Setup program, you may be prompted to close any running instances of CAT Shuttle


Requirements

CAT Shuttle Setup Wizard

The CAT Shuttle Setup Wizard will always install or update to the most recent version of CAT Shuttle.
  1. Welcome to the CAT Shuttle Setup Wizard - Click on the Next button to start installing CAT Shuttle.


  2. Virtual Serial Port Driver - Check the Install Virtual Serial Port Driver checkbox if you need to create a virtual Serial (COM) port to connect to CAT Shuttle.

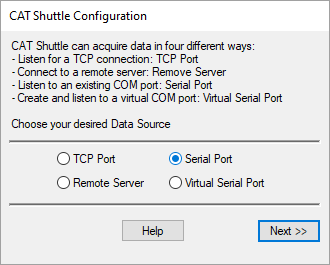
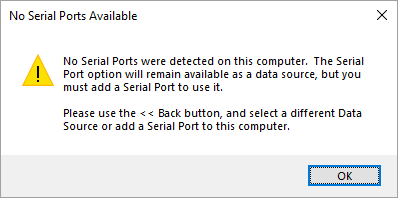
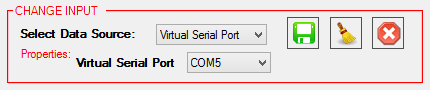
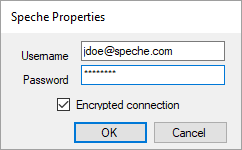
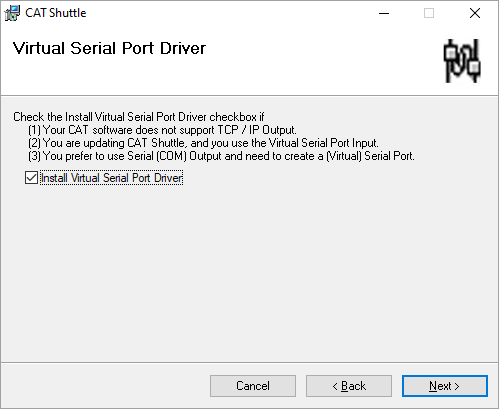
    Install the Virtual Serial Port Driver if...
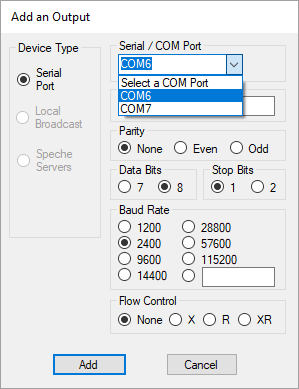
    1. Your CAT software does not support TCP/IP Output, and you need to create a Serial COM port.
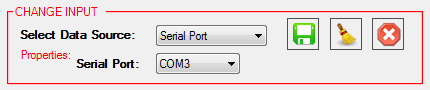
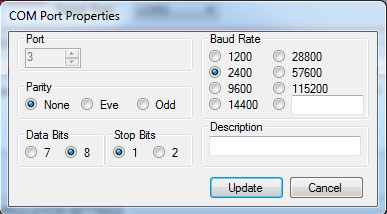
    2. You prefer to use your CAT software's Serial / COM Output, and need to create a Serial / COM port.
    3. You are updating CAT Shuttle, and you use the Virtual Serial Port Input.
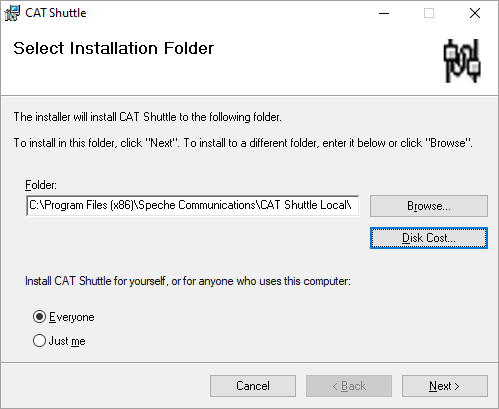
    In response to a driver conflict encountered by some LightSpeed Classic users, the Virtual Serial Port Driver is now an optional installation component. If you use or need the Virtual Serial Port Input, you must check the Install Virtual Serial Port Driver checkbox during installation.


  3. Select Installation Folder - Set the installation folder and user access, then click on the Next button.


  4. Confirm Installation - Click on the Next button to start installing CAT Shuttle.


  5. Installing CAT Shuttle - The progress bar will complete twice, initially while the CAT Shuttle files are downloaded, and then again as the installation is completed. The CAT Shuttle Information window will open after the progress bar completes for the second time.


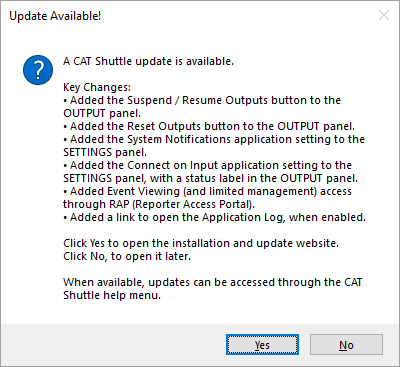
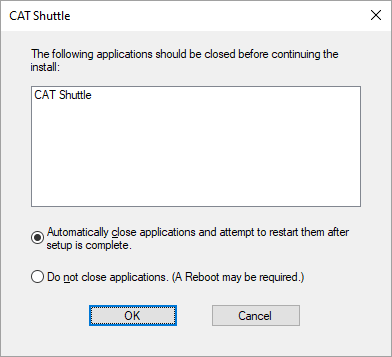
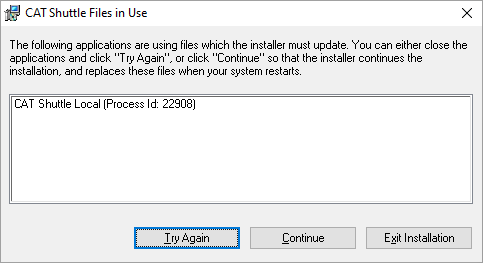
    Update Only: You may be prompted to close any running instances of CAT Shuttle, to complete the update.


  6. CAT Shuttle Information - Read the information offered, and then click on the Next button.

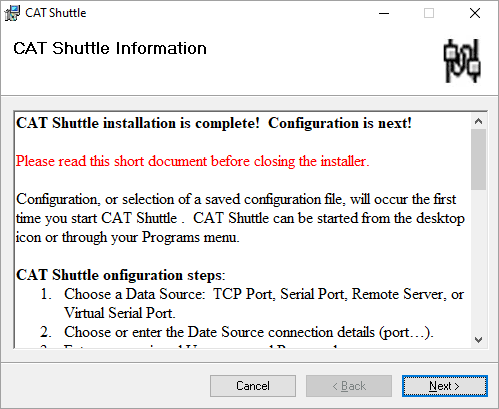
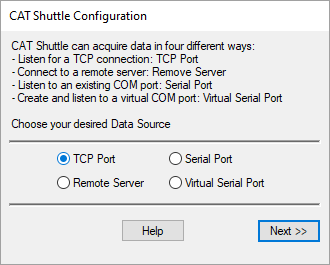
    If you chose to Launch CAT Shuttle after installation, the CAT Shuttle Configuration splash window may open at this time. We recommend that you finish the CAT Shuttle installer before configuring CAT Shuttle (click on the Next button).


  7. Installation Complete - Click on the Close button to close the CAT Shuttle installer.


CAT Shuttle Configuration

CAT Shuttle Configuration will begin the first time that CAT Shuttle is started. During configuration you will choose how CAT Shuttle will acquire data. Upon completion, CAT Shuttle will enter normal start-up operations, connecting to Speche and beginning to listen for data using the selected usage mode. All CAT Shuttle Configuration settings will remain in effect until changed.
  1. Start CAT Shuttle

    Click on the CAT Shuttle icon to to start CAT Shuttle.


  2. Open a saved CAT Shuttle configuration file

    Choose Yes to open a saved CAT Shuttle configuration file.
    Choose No to configure CAT Shuttle.


  3. Splash window

    Click on the Configure... button to start CAT Shuttle Configuration.
    Click on the Cancel button to exit CAT Shuttle Configuration. CAT Shuttle Configuration will resume the next time CAT Shuttle is started.


  4. Select the input Data Source

    CAT Shuttle can acquire data in five different ways:
    Unsure which one to choose?
    1. Determine the output options available to your (CAT) software (manual, help, or vendor).
      • If your software offers a TCP Output, you can use TCP Port.
      • If your software offers a Serial / COM Output, you can use Virtual Serial Port.
    2. When installing CAT Shuttle on the same computer as your (CAT) software, we recommend choosing either TCP Port or Virtual Serial Port.
    3. When installing CAT Shuttle on a separate computer, we recommend choosing either TCP Port or Serial Port (when using a multi-line block).
    4. You can change the input Data Source, at any time, while CAT Shuttle is running.

  5. Username and Password

    CAT Shuttle will use the entered Username and Password to connect to Speche and Remote Counsel events. Speche usernames and passwords are case-sensitive.
    Username and Password? - Don't have a Speche account? You weren't supplied credentials? Not to worry. Enter Username and Password (or anything). You still have time and options.


CAT Shuttle Usage

Quick Reference Links


CAT Shuttle with No Event and No Input


CAT Shuttle with a live Event and active Input


  1. Start CAT Shuttle


  2. CAT Shuttle Start-Up Sequence

    1. Instance Check
      • CAT Shuttle will check your computer to determine of another instance of CAT Shuttle is already running.
      • By default, only one instance of CAT Shuttle can be running on a single computer.
      • To run multiple instances of CAT Shuttle, you must uncheck the 'Allow single instance only' checkbox, in the Application Settings panel, before starting additional instances.

    2. Update Check
      • At start-up, CAT Shuttle will check for available updates.
      • You will be notified if an update is available, and given the option to install it now (Yes) or later (No).
        • Choosing Yes will open the CAT Shuttle Installer web page.
      • CAT Shuttle can be updated at any time, by choosing Update or Repair CAT Shuttle in the Help menu.


    3. CAT Shuttle UI
      • CAT Shuttle will open the primary display window.


    4. Connect to Speche
      • CAT Shuttle will try to connect to the Speche broadcast servers.
      • The Speche connection state will be displayed in the Output panel.

    5. Connect Output Device(s)
      • CAT Shuttle will try connecting any additional Output Devices stored in the configuration file.
      • The status of each Output Device will be reported in the Output panel.

    6. Username and Password Check
      • Upon connection to the Speche broadcast servers, CAT Shuttle will validate your username and password.
      • You will be notified of a validation failure.


    7. Event Check
      • Upon validation of your username and password, CAT Shuttle will determine if it is connected to a live event.
      • Event status updates are applied to both the Output panel and Quick Status bar.

    8. Monitor Input
      • CAT Shuttle will monitor the selected Input for a connection / data.
      • All incoming data is relayed to each Output Device (Speche).
      • The input status is displayed in the INPUT panel and Quick Status bar.
        • TCP Port - CAT Shuttle will listen for a connection on the designated TCP Port.
        • Remote Server - CAT Shuttle will connect to the remote server (designated IP Address and Port) and begin listening for data.
        • Serial Port - CAT Shuttle will connect to the designated Serial Port and begin listening for data.
        • Virtual Serial Port - CAT Shuttle will create or attach to the designated Virtual Serial Port and begin listening for data.
        • Direct Input - CAT Shuttle will open the Direct Input form and begin listening for data.

  3. Speche and Remote Counsel Events

    1. Verify the username and password for your Event.
    2. Start CAT Shuttle.
    3. Open the Speche properties page to verify or change the username and password.
      • In the Menu Bar, click on Tools >> Change >> Username and Password
      • In the OUTPUT Panel, click on Speche Properties
      • In the OUTPUT Panel, click on the Speche row in the output display and then click on Properties
      • The username and password are case sensitive.
      • Upon change to the username or password:
        • CAT Shuttle will reconnect to the Speche servers.
        • You will be nofitied if your username and password cannot be validated.
    4. Verify the Event Status for your connection.
      • In the Quick Status Bar, a green Event Status (E) indicates a live event.
      • In the OUTPUT Panel, "YES" in the Event column of the Remote Counsel / Speche row indicates a live event.
      • In the OUTPUT Panel, the Reporter Access Portal (RAP) button will turn green Production Viewer.
    5. View and manage your Event.
      • Open the RAP Production Viewer.
        • In the OUTPUT Panel, click on the Reporter Access Portal (RAP) button Production Viewer
      • Verify your Event connection and data.
      • Reset the data detection, or transfer the Event, if needed.
    6. Make the data connection.
    7. Verify the status of your input data connection.
      • Check the Data Status in the INPUT Panel.
      • In the Quick Status Bar, a green or yellow Input Status (I) indicates an active or idle data connection.
    8. Verify that CAT Shuttle is receiving and sending data.
      • Send test data through the selected data source (from your CAT software or other).
      • In the INPUT Panel, the Bytes Received should be increasing.
      • In the OUTPUT Panel, the Bytes Sent should be increasing.
      • Both the Input Status (I) and the Output Status (O) in the Quick Status Bar should be green.
      • You should see your text in the RAP Production Viewer.
    9. Acquire audio, if doing a remote job.

  4. CAT Shuttle User Interface

    1. Quick Status Bar
    2. Menu Bar
    3. INPUT Panel
    4. OUTPUT Panel
    5. SETTINGS Panel
    6. Application Settings Panel
    7. About Panel


    1. Quick Status Bar

      Your key status indicators, available at a glance.

      • I: Input Status
           - Initializing input device | Input device failure
           - No input connection : Waiting (or reconnecting)
           - Input connected : Idle (no incoming data)
           - Input connected : Active (receiving data)
      • O: Output Status
           - Initializing output device | Output device failure
           - No output connection : Reconnecting
           - Output connected : Idle (no outgoing data)
           - Output connected : Active (sending data)
      • E: Event Status
           - Checking event status | Status check failure
           - No event connection | No event found for the supplied account / credentials
           - Connected to a live event
      • Examples:
        Initial Quick Status at application load:

        At start-up with no event: Waiting on input, Connected to output (but idle), No event:

        At start-up with a live event: Waiting on input, Connected to output (but idle), Connected to a live event:

        Active connections with a live event: Receiving input, Sending output, Connected to a live event:
    2. Menu Bar

      Access every tool, feature, or option through the Menu bar.
      • File

        • Configure - Modify your CAT Shuttle configuration
          • Input
            • Change Input - Change the data source.
            • Input Properties - Change the properties of the current data source.
          • Output
            • Output Properties
              • Speche - Change the Speche output properties.
              • Serial - Change the Serial output properties.
            • Add an Output - Add an output device.
            • Remove an Output - Remove an output device. An output device must be hightlighted to enable this menu item.
            • Username / Password - Change the username and password for your Speche connection.
            • Encryption - Change the encryption setting for your Speche Connection.
          • Application Settings - Open the Application Settings panel
          • Notifications - Open the Application Settings panel
        • Load Configuration... - Load a saved configuration file
        • Save Configuration... - Save your configuration to a file
        • Print Configuration... - Print your configuration
        • Exit - Close CAT Shuttle
      • Tools

        • Viewers
          • Reporter Access Portal (RAP) - RAP is your command center for running Speche and Remote Counsel Events.
          • Local Viewer - Open a local text viewer and assign a data format.
        • Change
          • Input - Change the data source.
          • Output
            • Add - Add an output device.
            • Remove - Remove an output device. An output device must be hightlighted to enable this menu item.
            • Properties
              • Speche - Change the Speche connection properties.
              • Serial - Change the Serial output properties.
          • Username / Password - Change your username and password.
          • Encryption - Enable to disable connection encryption.
          • Application Settings - Change your application settings.
          • Notifications - Change the notification settings.
        • Troubleshooting
          • Reset Input Device - Stop and restart the current input device.
          • Reset Output Device(s) - Stop and restart all output devices.
          • Local Viewer - Open a local text viewer and assign a data format.
        • Events
          • Reporter Access Portal (RAP) - RAP is your command center for running Speche and Remote Counsel Events.
      • Help

        • CAT Shuttle Help - Open the CAT Shuttle help page (this document).
        • Update or Repair CAT Shuttle - Open the CAT Shuttle Installer web page.
        • About CAT Shuttle - Open the About panel.

    3. INPUT Panel

      Use the Input panel to monitor or change the data source.


      • Change Input - Click on the Change Input button to open the Change Input panel and change the data source properties or select a different data source.
      • Data Source - The input selection being monitored by CAT Shuttle. Examples: TCP Port 7000, Virtual COM5, Direct Input
      • Data Status - The status of the data source connection. Examples: No Connection..., Connected
      • Bytes Received - The number of bytes received over the current data source connection. This value will reset (to 0) with every reconnection or input change.
      • Disconnections - The number of disconnections between CAT Shuttle and the data source. This value will reset (to 0) with every input change.

    4. Change Input Panel

      Use the Change Input panel to select a data source or change its properties.


      • Select Data Source - The pull-down will display the current data source. Selecting a different data source will enable both the Save and Reset buttons.
      • Properties - The available properties for the current data source. Changing any properties of a data source will enable both the Save and Reset buttons.
      • Save - Save any changes to the data source or its properties.
      • Reset - Reset the Change Input panel (to the current data source and properties).
      • Cancel - Cancel out of the Change Input panel without making any changes.

      Data Sources and Properties

      • Use TCP Port to accept a TCP connection from your (CAT) software or device.
      • Use Remote Server to make a TCP connection to a remote data server.
      • Use Serial Port to connect to an existing Serial / COM port or USB Serial device.
      • Use Virtual Serial Port to create a virtual Serial / COM port that your (CAT) software or device can connect to.
      • Use Direct Input to send keyboard data or use voice recognition software.

      • TCP Port
        Use this input to receive data from software or devices that can make TCP connections. CAT Shuttle will listen for connections on the selected TCP Port.


        1. Choose TCP Port in the Select Data Source pull-down.
        2. Choose a TCP Port number that will be monitored for a connection.
        3. Save the new input.
          • If the selected port is in use, a different port must be selected.
        4. Start the connecting device or software (if not already started).
        5. Connect the device or software to CAT Shuttle.
          • Connection IP Address - Connections from the same computer should use localhost or 127.0.0.1 for the IP Address.  Connections from another computer should use the IP Address (public or private) of the computer that is running CAT Shuttle.
          • Connection Port - Use the TCP Port selected in #2. The selected port will be displayed as the Input panel Data Source.
        6. Check the Data Status (Input panel) to determine whether your device or software is connected to CAT Shuttle.

      • Remote Server
        Use this input to receive data from software or devices that accept TCP connections. CAT Shuttle will connect to the designated IP Address and Port.


        1. Start the software or device that will listen for a TCP connection from CAT Shuttle.
        2. Choose Remote Server in Select Data Source pull-down.
        3. Enter the IP Address of the remote server.
        4. Enter the TCP Port that is being monitored by the remote server.
        5. Save the new input.
        6. Check the Data Status (Input panel) to determine whether CAT Shuttle is connected to the remove server.
        7. (Optional) Verify the CAT Shuttle connecton on the remote server.

      • Serial Port
        Use this input to receive data from a Serial Port (or USB Serial Device).


        • A Serial Port must be available to use this input.

        1. Enable the Serial Port or USB Serial device, if needed.
        2. Connect the appropriate cable, serial or USB, to the computer running CAT Shuttle.
        3. Connect the other end of the cable to the data provider (multi-line block, encoder, or a computer running CAT software).
        4. Verify the Serial Port properties of the data provider connection.
        5. Choose Serial Port in the Select Data Source pull-down.
        6. Choose the Serial (COM) Port.
        7. Set the connection properties to match the properties used by the data provider.


        8. Save the new input.
          • If the selected port is in use, a different port must be selected.
        9. Check the Data Status (Input panel) to verify that CAT Shuttle is connected to the Serial Port or USB Serial Device.

      • Virtual Serial Port
        Use this input to create a Virtual Serial Port to receive serial data from an application on this computer.
        You must choose to install the Virtual Serial Port Driver to have the Virtual Serial Port input option.


        1. Choose Virtual Serial Port in the Select Data Source pull-down.
        2. Choose the Virtual Serial (COM) Port that will be created.
        3. Save the new input.
          • If the selected port no longer available, a different port must be selected.
        4. Start the application or device that will connect to the virtual serial port.
          • Many applications only scan for serial ports at start-up.
        5. Connect the application or device to the Virtual Serial (COM) Port selected in #2.
        6. Check the Data Status in the Input panel to verify that your software connected to the Virtual Serial Port.

      • Direct Input
        CAT Shuttle can accept data from a keyboard or voice-recognition software through the Direct Input Form.


        1. Choose Direct Input in the Select Data Source pull-down.
        2. Save the new input.
        3. The Direct Input Form will open.
        4. Place your cursor in the text area.
        5. Type into the text area using your keyboard or software.

    5. OUTPUT Panel

      Use the Output panel to monitor, suspend, reset, or change your outputs and their properties.


      • Output Devices / Connections - Each row represents an output device / outbound connection.
        Double click on an output (row) to open its properties page.

        Columns:
        1. Type - The type of output in that row: Speche, Viewer, or Local (Broadcast).
        2. Desc(ription) - Description of the output or connection.
        3. State - The current connection state: Connecting, Connected, Wait on Input, or Disconnected.
        4. Bytes Sent - The number of bytes sent over each connection.
        5. Event - Live event state: Yes or No (Speche / Remote Counsel connection only).


      • Suspend / Resume Outputs - Use the Suspend / Resume Outputs button to temporarily stop all data buffering and output.

        When you click on the Suspend Outputs button:
        • Buffering of the input data will cease
        • Outputting of the input data will cease
        • The button will change to Resume Outputs
        • All Output Devices will have a red background
        • You can safely modify dictionary entries


        When you click on the Resume Outputs button:
        • Buffering of the input data will resume
        • Outputting of the input data will resume
        • The button will change to Suspend Outputs
        • All Output Devices will have a white background
        • All data will be sent to live Event


      • Output Setting Label - This label reflects whether Connect on Input is enabled or disabled.

        • Stay Connected is always displayed when Connect on Input is disabled.


        • Waiting on Input is displayed when Connect on Input is enabled without an input connection.


        • Connect on Input is displayed when Connect on Input is enabled with an input connection.


      • Reset Outputs - Use the Reset Output button to disconnect and reconnect all outputs.

      • Add an Output Add an Output - Add a new output device / outbound connection.

        Available Output Devices:
        • No Outputs: The following message will be offered when no outputs are available.
          • Serial Port: A serial port must be found on the computer or device. Enable an existing serial port or add a USB serial device to enable this option.

          No Outputs Available

        • Serial Port - To output to a serial port, select the Serial Port device type and configure its properties. A Serial (COM) Port must be found to enable this option.

          Output to a Serial Port

          Configuration:
          • Serial / COM Port - Select the port to use, if more than one is available.
          • Description - (Optional) Enter a name or description for the output.
          • Parity - Set the parity to match the receiving device.
          • Data Bits - Set the data bits to match the receiving device.
          • Stop Bits - Set the stop bits to match the receiving device.
          • Baud Rate - Set the baud rate to match the receiving device. If you do not see the required rate, choose the text box and enter it.
          • Add - Click on the Add button to establish the outbound connection to the selected serial port.
          • Cancel - Click on the Cancel button to exit without adding an output.

          Serial / COM Port Output Display - A row will be added to the Output display for Serial / COM connection.

          Output to a Serial Port

          Serial Port Properties Page - Open the Serial Port Properties Page to change the connection properties.
          • Double-click on the Serial / COM Port row in the Output Display.
          • Click on the Serial / COM Port row in the Output Display and click on Properties.

          Output to a Serial Port


      • Remove an Output Remove an Output - Remove the selected output device / outbound connection. To enable this option, you must select a row in the output panel.
        1. Select an output (row) in the output display.
        2. Click on the Remove an Output button Remove an Output.
        3. Confirm your removal selection.

          No Outputs 1

        4. Removing the last output will trigger following actions:
          • You will be notified.

            No Outputs 1

          • The Output Display and the Add an Output button will change color.

            No Outputs 2

      • Properties Output Properties - Open the properties page of the selected output devcie / outbound connection. To enable this option, you must select a row in the output panel.
        • Double-click on an output (row) in the output display.
        • Using the Properties button Properties.
          1. Select an output (row) in the output display.
          2. Click on the Properties button Properties.

      • Speche Properties Speche Properties - Click on Speche Properties to open the Speche properties page.

        Initial

        • Username - Enter or edit the username for your Speche or Remote Counsel event.
        • Password - Enter or edit the password for your Speche or Remote Counsel event.
        • Encrypted Connection - Check this box to encrypt your Speche connection (default).
          Encrypted Speche connections will be attempted in the following order.
          • Connect to server port 443 using SSL / TLS.
          • Connect to server port 4000 using an 1028 bit RSA key exchange with DES data encryption.
          • Connect to server port 80 using an 1028 bit RSA key exchange with DES data encryption.
        • OK Button - Click OK to commit any changes and reconnect to Speche.
        • Cancel Button - Click Cancel to ignore any changes and exit the Speche properties page.

      • Viewer Local Viewer - Click on Viewer to open the Local Viewer form.
        • The local Viewer is a convenience and troubleshooting tool.
        • View and troubleshoot data and formatting issues.
        • To properly display your input, a Data Format must be applied.
        • The local Viewer uses light versions of our data parsers.
          • CaseView: Timestamps are ignored
          • Bridge: Timestamps and Refresh commands are ignored
          • Line 21: All data formatting is ignored
          • ASCII / ANSI: Characters above 255 are ignored


        • Data Format - Select or change the Data Format applied to the Input data source. You must click the Apply button to use the selected Data Format.
          Changes to the Data Format are applied to an active Local Broadcast.
          The new Data Format is applied to data received after clicking on the Apply button.
          • Raw Data - Select Raw Data to view unmodified data. Data rendering will depend on the chosen Text Encoding. Raw Data is the default Data Format.
          • CaseView - Select CaseView when receiving (Summation) CaseView from CAT software.
          • ASCII / ANSI - Select ASCII / ANSI when receiving ASCII (0-127) or ANSI (0-255) data from a keyboard or CAT software. ASCII / ANSI is the default Data Format when using the Direct Input form.
          • Line 21 - Select Line 21 when receiving data formatted for television encoding (IEA-608 / CEA-608).
          • Bridge - Select Bridge when receiving Law Bridge Protocol from from Eclipse or other CAT Software.
          • Unicode - Select Unicode when receiving non-English language data from the Direct Input form.
        • Text Encoding - Select or change the Text Encoding applied to the Input data source. You must click the Apply button to use the selected Data Format. Changes to the Text Encoding do affect any outputs.
          Some symbolic languages may require Unicode encoding to display correctly.
          Some keyboard input may require Western European encoding to display correctly.
          The new Text Encoding is applied to data received after clicking on the Apply button.
        • Apply Button - Click on the Apply button to apply a change in Data Format or Text Encoding.
        • Cancel Button - Click the Cancel button to reset any changes made to the Data Format or Text Encoding.
        • Top Window Checkbox - Check the Top Window checkbox to keep the Local Viewer form on top of all other windows in your desktop display.
        • Pause / Resume Data Button:
          • Pasue Data Button - Click on the Pause Data button to pause the addition of text and allow scrolling.
          • Resume Data Button - Click on the Resume Data button to resume the live data feed.
        • Change Font Button - Click on the Change Font button to change the font, font style, or font size.

        CaseView Example (with CaseView data...)


      • RAP Production Viewer - Click on RAP to open the Reporter Access Portal (RAP) in your default browser.
        • The RAP button background is green during live Events RAP.
        • You will be logged into RAP using your CAT Shuttle credentials.
        • See your live, upcoming, and recent Events.
        • View your data in the same player as your clients.
        • Test or troubleshoot software changes with on-demand Test Center Events.


    6. SETTINGS Panel

      Use the Settings Panel to view key status information and to open the Application Settings Panel.
      Settings at Installation

      Initial

      • System Notifications status:
        • Enabled - System Notificaitons are sent to Windows on connections and disconnections.
        • Disabled - No System Notifications are sent.
        • Clicking on the status will open the Applicaiton Settings Panel.
      • Email Notifications status:
        • Enabled - Email Notificaitons are sent to the provided server or relay.
        • Disabled - Notification milestones are ignored.
        • Clicking on the status will open the Applicaiton Settings Panel.
      • Single Instance status:
        • Enabled - (Recommended) Allow only one instance of CAT Shuttle to run on your computer.
        • Disabled - (Advanced) Allow mulitple CAT Shuttle instances to run on your computer.
        • Clicking on the status will open the Applicaiton Settings Ppanel.
      • Application Logging status:
        • Enabled - Usage and connection information will be logged on your computer.
        • Disabled - Usage logs are not maintained. Local logging of errors cannot be disabled.
        • Clicking on the status will open the Applicaiton Settings Panel.
      • Connect on Input status:
        • Enabled - CAT Shuttle will only connect to Outputs while an Input is connected.
        • Disabled - CAT Shuttle will connect to all Outputs at start-up and remain connected.
        • Clicking on the status will open the Applicaiton Settings Ppanel.


    7. Direct Input Form

      Use the Direct Input form to send data from your keyboard or voice-recognition software.
      • Opening and closing of the Direct Input form is controlled through the Input Panel.
      • The data source must be set to Direct Input to open the Direct Input form.
      • The Direct Input form can be resized, but it cannot be minimized.
      • The Direct Input form can always be accessed through its task bar icon.
      • Check the Top Window box to prevent any windows from covering the Direct Input form.

      Input Mode


      • Pause Button - Click on the Pause button to stop data transmission and enter Pause Mode.
      • Change Font Button - Click on the Change Font button to change the Font, Font Style, or Font Size of the entered text. Changing the Font attributes will only impact your display.
      • Top Window Checkbox - Check the Top Window checkbox to keep the Direct Input form on top of all other windows in your desktop display.
      • Text Area - Place your cursor (click) within the text area and type (or speak). The entered text is sent to all outputs / viewers.

      Pause Mode


      • Resume Button - Click on the Resume button to enter Input Mode and send data.
      • Change Font Button - Click on the Change Font button to change the Font, Font Style, or Font Size of the entered text. Changing the Font attributes will only impact your display.
      • Top Window Checkbox - Check the Top Window checkbox to keep the Direct Input form on top of all other windows in your desktop display.
      • Text Area - The transcript can be copied, but it cannot be edited while in Pause Mode.

    8. Application Settings Panel

      The Application Settings panel allows you control CAT Shuttle behaviors, set up e-mail notifications, and access CAT Shuttle logs. Notifications are to assist with the administration of CAT Shuttle instances running on remote servers. Verify the SMTP server and e-mail address before enabling this feature. Notifications failures will be logged in the CAT Shuttle error log.

      Default settings after installation


      • Application Settings
        • System Notifications
          • Check (Default) to receive connection status notifications from Windows.
          • Uncheck to disable status notifications.
        • Application Logging
          • Check to enable CAT Shuttle logging.
            While enabled, a link will be offered to open the log file.
            CAT Shuttle application and error log location:
            • Default Installation Folder: Log files will be located in %LocalAppData%\VirtualStore\Program Files (x86)\Speche Communications\CAT Shuttle\
            • Other Installation Folder: Log files will be located in the installation folder
          • Uncheck (Default) to disable CAT Shuttle logging and clear the log file.
        • Single Instance (Advanced)
          • Check (Default) to allow only one instance of CAT Shuttle to run on your computer.
          • Uncheck to allow multiple CAT Shuttle instances to run on the same computer.
        • Connect on Input (Advanced)
          • Check to only connect Outputs while an Input is connected.
            • Serial Port Input: While using Serial Port Input, this setting has no effect. All Outputs will remain connected.
          • Uncheck (Default) to keep all Outputs connected while CAT Shuttle is running.
      • Email Notifications
        • SMTP Server or Web Relay - Enter the DNS name or IP Address of your SMTP server or Web Relay.
        • Notification Email Address - Enter the e-mail address to receive CAT Shuttle notifications to.
        • Send notifications
          • Check to enable Email Notifications to provided Email Address, through the provided SMTP server or relay.
            • Email Notification failures will be logged in the CAT Shuttle Error log.
          • Uncheck (Default)
      • OK - Return to the primary display window.

    9. About Panel

      The About panel displays your verion of CAT Shuttle and how to obtain support.


      • OK - Return to the primary display window.

Repair or Remove

CAT Shuttle can be repaired or removed in two ways: